Saturday, April 9, 2011

Towel Toppers

One of my best friends found out I just started to crochet and asked me to make her some towel toppers.  Seems her frisky doggies won't leave her kitchen towels alone.   I hadn't seen one in years and years and went on a search.  Surprisingly, there are more than a few options.  

Most require cutting a towel in half, serging or sewing the edges and then using a hole punch to start the crochet.  This just did not thrill me. 

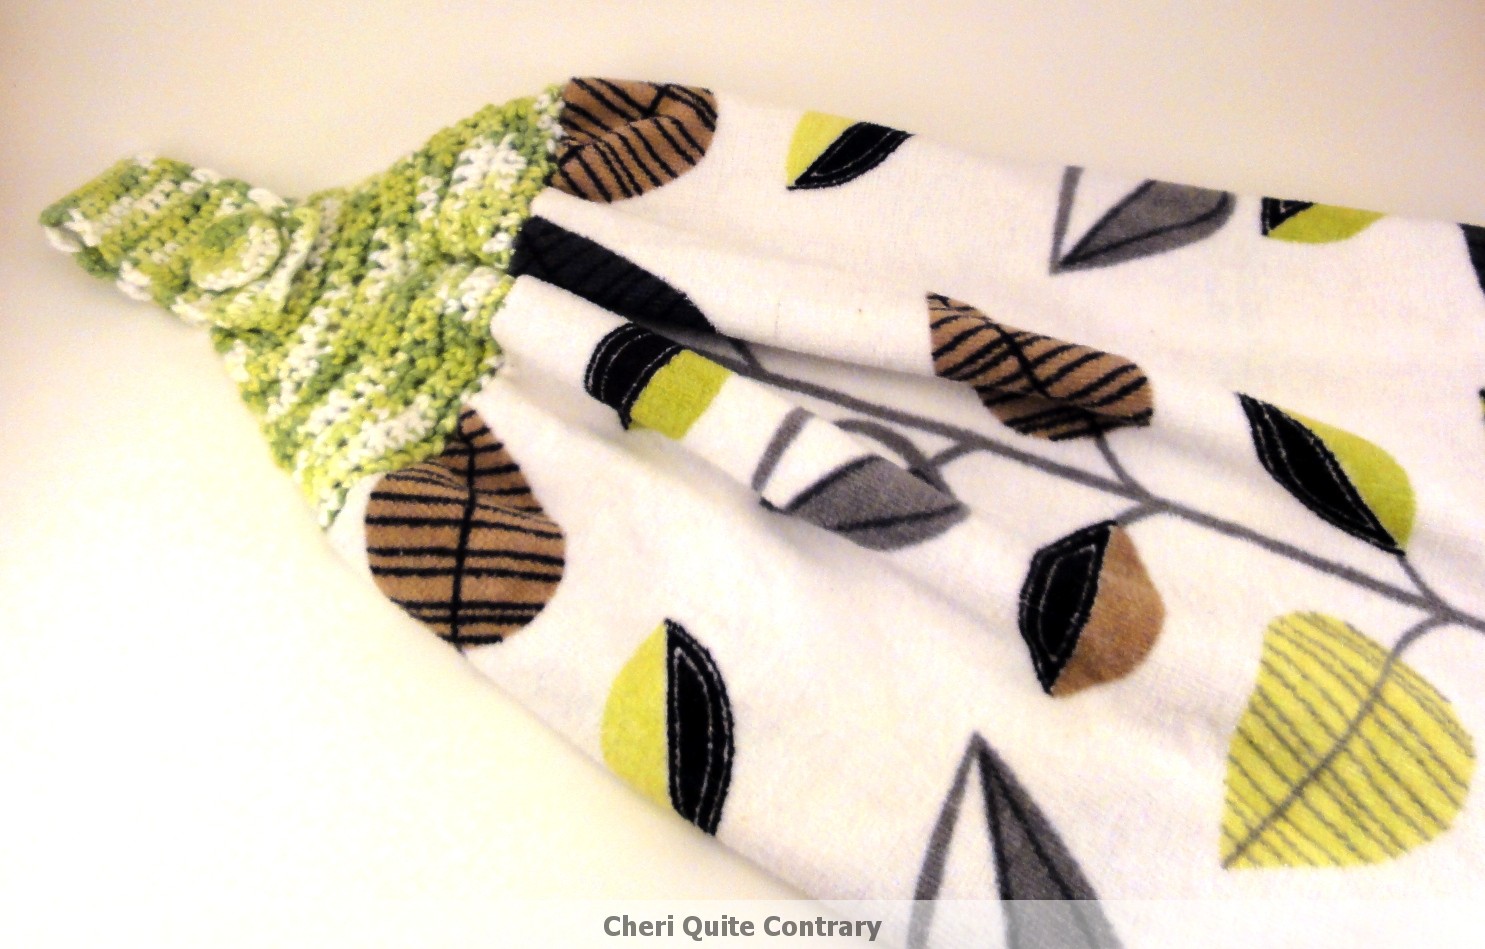
When I ran across THIS pattern, using the entire towel and an embroidery stitch to start, I was in love.  My first attempt came out like this:


One thing I thought would be neat to try but I did NOT end liking was the recommended crochet button.  On the ones I actually made for her gift, I purchased traditional buttons.


For those who are visual like me, Teresa also made a You Tube video working the pattern.


Stay tuned for the finished gift project.....waiting for her to receive it before I publish.  Hope she likes it!  Here is a sneak peek showing the embroidery stitch beginning the project:


I may be linking to THESE parties.


Share/Bookmark

Friday, April 8, 2011

I Was Featured!


Boogieboard Cottage


Want to learn how to take amazing photos?   Check out my tutorial!!

Have you visited Mary's blog yet?  If not, scoot on over and check it out!!

Thanks Mary!!


Share/Bookmark

Wednesday, April 6, 2011

WIP Wednesday

I found the most fun pattern ever!  I love it for a few reasons:

1.  Crochets up really quickly.

2.  Pattern is so easy...no need to keep reading the instructions.

3.  Many options for personalization/colors

4.  Gorgeous result.

And get ready..........these photos were taken in my new light box with my.........
iPhone 4!!!!!!!!

You need a light box!!!!!
The notch up at the top is the unfinished thread.........waiting for the 2nd side to be added.  I tucked it under for photo purposes.


This pot holder is halfway done.  There is a second side to it and I can't wait to jazz it up with other colors.  Isn't this the neatest project?  I made this in less than an hour - honestly.  2 months into crocheting........go try this pattern!!  I'm adding this to another project for a friend......and I'm betting she won't see this before I mail it off.  Maybe she'll surprise me.  lol


Free Pattern - Scalloped Pot HolderHERE.

Do you know how I found it?  I ran across Sarah London's blog....and her "iCrochet" page, where folks can add a link to their crochet projects.  It is so inspiring....all those projects.  Check it out!!

I may be joining THESE parties.


Share/Bookmark

Posies in a Row Bookmark

I decided that since it IS April, maybe I should look for some spring crochet projects?  Cowls and gloves are nice, but is it season appropriate?  lol

I saw these cute bookmarks and loved them.  I made 3 the other night and played with them in my new light box.  


I found the free pattern HERE.   I whipped these up in a just a few hours (took a little longer because I put on 2 different tails.........decided I had to have green)!

Have you decided to learn crochet yet?  It's fun!


Share/Bookmark

Sunday, April 3, 2011

DIY Lightbox Tutorial

Are you ready to take AWESOME photos, even if you have an inexpensive camera?  Well, get ready!!

Since I started crocheting at the end of January, I've noticed some blogs have amazing photos with great color and stark white backgrounds.   I just assumed that must be professional equipment but found out one can make their own lightbox for next to nothing!

LUCKY for me, I am married to a very meticulous amazing ENGINEER.......they are always known for their attention to detail and although their work often takes 10 times longer than someone else (inside engineer joke!), you can't beat the end product.  (You should check out what I call the "forensic vacuuming" my guy can accomplish when he feels like it!)

You will need the following:

Cardboard box
Box cutters
Muslin fabric or tissue paper
Glue gun and glue stick
3 Lights
Poster board or Bristol Paper (found ours at Michael's)
Tape

 1.  Cut out the top of the box, leaving a "picture frame" edge to attach the muslin or tissue paper.


 2.  Cut out 2 of the sides.


3.  Cut out the front on 3 edges,  leaving one side attached (so it can lay down in front, as shown).


4.  Glue or tape muslin fabric (or tissue paper) on the open sides except for the front.


5.  Put the poster board or Bristol board inside, going up the back.  We first used regular ol' poster board, but it looked cream in the photos, so we switched to the Bristol board, found at Michael's or any store that sells painting supplies.


6.  Now add the 3 lights.......my husband elevated my entire lightbox so I can take my own photos (I cannot bend, lift or twist).....so the top light was able to be hung from the dining room light fixture.

Yes, this is an ottoman on our dining table.  lol

 I needed a mannequin head for my crochet hats and saw them online for around $6-9.  But we went to a local wig store and found this one for $3.99.  Perfect!


Hubby says we are currently using 75 watt bulbs and he wants to change them to 100 watt.   Meanwhile, check out the quality of the photos!!

BEFORE


AFTER

Isn't that awesome?????  I am SO happy!!!!  My only problem is.....where to put this lightbox??  At the rate I am creating crochet products.........I need it to stay out.  lol  I am hoping to sell things in a few months......and these photos will look great.  If you look on Etsy.com, there are some great sellers but their photos are blah.....whereas newer sellers with great photos are making the sales.  Makes a huge difference!

Hope you enjoyed this DIY Light Box Tutorial!! 

I totally forgot to add what camera I am using.....you might be surprised............it is a 

Sony Cybershot!!

No fancy schmancy camera for this girl.  Frugal here!!  And the CAMERA photo was taken by my Iphone 4.  Can you even believe the effects of the light box??????  Gotta get one, people!!

I may be linking to THESE parties.


Share/Bookmark

Saturday, April 2, 2011

Gorgeous Hat with Large Flower

You guys.........I am in LOVE!!!!!!!!  Every chance I get, I walk through stores that sell yarn, picking every skein up trying to find the SOFTEST yarn out there.  (I have very distinct textural issues.....can't handle anything NOT soft......).    I ran across this yarn in Dallas at a Hobby Lobby (have to check mine here in TN to see if they also carry it) - Premier Yarns Serenity Chunky Weight in Parachute Purple and Rhododendron.  I had no idea what I was going to use it for, but I pictured them together.  

Look what I decided to make!!!!!!


Isn't this to die for??  I am just a purple fanatic......

OK, but here's the nitty.  You know my trials and tribulations with stitch gauge if you've been reading my crochet posts and this was no exception.   When I finished the hat, it was way too long.  I considered rolling the edge up to make a cuff and permanently tacking it down, like this:


But I just kept looking at it and I wondered......could I get my scissors out, snip the ends and pull out a few rows and do something different?  I went for it - I pulled out the last 2 rows of purple yarn and decided to do the pink on the very last stitch edge in single crochet.......and it worked!! 


I am SO happy I took the risk!!!  

This hat was intended to be a hat with a ribbon bow.........but instead of doing the only "triple crochet" row in the hat, I kept up with the double crochet and then added my own large bow.  


Pattern I used for the large flower:

(flowers at bottom of pattern instructions)

Yes, this was supposed to be child-sized.  HA!  I wonder how small of a hook I will have to use to get MY stitching to end up child-sized???   But I LOVE LOVE LOVE this hat - it is SO soft.  I will definitely be wearing this with my beloved purple coat next winter......(and this cracks my family up because I am NEVER cold, but I will wear this like I am!)

Grey scarf not mine and of course, I will have to make myself a coordinating scarf!  
Purchased at Stein Mart....Peck & Peck Collection.
I may be linking to THESE parties.


Share/Bookmark

Friday, April 1, 2011

Sneak Peek

What have I been up to this week?


Details tomorrow!

And if you like this crisp photo, don't miss a great tutorial on Sunday!


Share/Bookmark

My Lucky Day!!

One day last week, a wonderful blogger named Megan contacted me to let me know I was her 30th follower and had won a beautiful handmade necklace of my choosing.  I was so excited!!! 

I knew immediately the hot pink/black and white combo would be perfect for me and I couldn't wait to see it.

Well, it came today and it is AMAZING!!  I have to show this to you!


One thing I was surprised about but LOVE is that the tie is stretchy......not only feels so soft and awesome but gives a nice "feel" in terms of drape.   The hot pink fabric she uses is more like a t-shirt material and SO soft.

You can visit Megan at her blog, The Mrs. 

You can check out her shop HERE.

I can promise you will LOVE these necklaces!!

She also mentioned me on her blog recently, in a review of the Milani lip glosses, although a different style than the one I love.   I myself would never have purchased that purple gloss unless another blogger had not worn it in a video and sold me on it!  (Video on my link.)

Thanks Megan!


Share/Bookmark